
Of all the parts that make up a home, the roof is by far the most important. This tireless protector fights against everything nature throws at it, giving you the feeling of shelter and security. Whether you’re a seasoned do-it-yourselfer or a beginner about to take on their first major project, putting up a new roof can be overwhelming. Well, there’s no need to worry, because in this guide we will take you step by step through each process involved in the roofing installation. From material selection to laying that last shingle, we’ve got you covered. So roll up your sleeves and get ready to have a roof that will not only be strong, but stylish as well.
Step 1: Understanding Different Roofing Materials
One roofing system does not fit all. The market is littered with choices, each having its pros and cons. Here’s the rundown:
Asphalt Shingles: The staple for most homeowners, and why not? They are inexpensive, durable, and have dozens of color options and styles. Most climates are easily accommodated by asphalt shingles, so they will do a great job keeping your house snug and leak-free.
Metal Roofing: With a reputation for being very tough, long-lasting, and very energy-efficient, these rugged contenders can withstand just about everything that Mother Nature delivers. It has a high initial cost, but over the long term, it is cost-effective.
Tiles: Ceramic or concrete, tiles give your roof an aesthetic touch of class. Ideal for homes in hotter climates, they are good for reflecting heat. But it is a structure that goes under them because, let’s be honest, they’re no lightweights!
Step 2: Tools and Equipment Needed
Before you climb that ladder, make sure you’re armed with the right gear. Here’s your toolkit checklist:
- Hammer and Nails: The bread and butter of roofing. You’ll be doing a lot of hammering, so get comfortable!
- Measuring Tape: Measure twice, cut once—a golden rule in the world of construction.
- Safety Harness: Safety first! A harness is a must to keep you secure up there.
Don’t forget the safety equipment:
- Gloves: To protect your hands from sharp edges.
- Helmet: Keep that noggin safe.
- Safety Glasses: You only get one set of eyes—shield them from debris.
Step 3: Removing Old Roofing
Out with the old! Tearing off old shingles can raise quite a bit of dust and maybe a few memories, but it is vital to the process. Before you begin, practice safety first! Wear personal protective equipment, stabilize your ladder, and exercise extreme caution before attempting to remove the old shingles.
Tear off the old shingles starting from the top down. You may use a roofing shovel or pry bar to lift shingles and nails. Important note: Dispose of old materials properly. In many locations, there are regulations on how to dispose of debris from construction. Proper material disposal minimizes environmental impacts and maintains your project in compliance with safety regulations.
Step 4: Inspecting and Repairing the Roof Deck
The removal of the old shingles unveils the deck of the roof. Now, here is where you will need to look for any type of damage—anything like rotted wood or water stains. Repair damaged areas with new wood.
With a strong and clean deck, you can be assured that your new roof will be in place correctly. Cleanliness means a lot when it comes to roofing. Ensure that the surface is free from dirt, nails, and dust. A clean deck provides a much better base for the underlayment and shingles to be installed afterward. It is a bit similar to the strong foundation needed for a tall building.
Step 5: Installing Underlayment
Think of the underlayment as your roof’s first line of defense against water. Therefore, underlayment is an important material for weatherproofing to avoid leakages. The correct type of underlayment must be chosen according to climate and roofing material. Roll out the underlayment on the roof from the eave, overlapping with each course you go up.
Attach it using roofing nails and then make sure it lies down smooth without any wrinkles in it. The underlayment will play a role in increasing the energy efficiency of your roof. It is another layer that offers resistance against moisture and wind, keeping the indoor temperature consistent, hence reducing energy costs and making the place cozier.
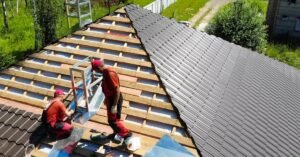
Step 6: Laying Out the First Set of Shingles
Now the fun part: laying shingles! Begin on the bottom edge of the roof, typically an eave, and work up. The very bottom row of shingles will dictate the lines on all of the rows that follow. Make sure they’re straight and square.
Use a chalk line to help hold your rows straight. Fasten each shingle with roofing nails. The nails need to penetrate through the underlayment and into the roof deck. Proper placement ensures that the shingles are secure and resistant to wind and weather.
Step 7: Completing the Shingle Installation
As you move along a row, move to the next, ensuring that each shingle of the previous row overlaps the one beneath it. The overlapping forms a watertight roof. Pay attention to where the roof meets any vents and chimneys, as well as other roofline features.
Here is where you want the flashing and sealing to be sufficient to stop any infiltration and keep the roof doing its job of protection. Laying down the shingles on the rooftop is a precise process. Each row should align perfectly with the previous one, maintaining a consistent pattern. This not only looks better but also enhances the roof’s ability to shed water efficiently.
Step 8: Installing Roof Features
Flashing is one of the most important steps in roofing. Flashing is sealing around chimneys, vents, and other penetrations to prevent water from sneaking in. Use metal flashing for durability, and just to be sure the sealing is right, you can secure the flashing with roofing cement.
Next, all joints and edges must be properly sealed. Apply quality sealant so that there are no places for water infiltration, especially in valleys, ridges, and other places that are vulnerable. A well-sealed roof extends the lifespan of the roof while improving weatherproofing.
Step 9: Finishing Touches
Installing ridge caps is the final step in your roofing project. Ridge caps cover the peak of the roof, providing a finished look and extra protection against wind and rain. Nail them in place, ensuring they’re secure and aligned.
Conduct a final inspection. Walk around the roof, checking for any loose shingles, nails, or other issues. Make sure all areas are properly sealed and that the roof looks uniform. This final check ensures your hard work pays off with a durable, weatherproof roof.
Cleanup is just as important as installation. Remove all debris, nails, and leftover materials from the job site. A clean work area is safe and shows respect for your property and the environment.
Conclusion
Yes, with that your brand-new roof is ready to face seasons head-on, boosting your property value, and keeping your energy bills in check. Remember, if any part of this journey seems too daunting, calling in a certified contractor is the way to go. For more information, you can contact the experts at Roofing In Connecticut. We provide the best advice on all types of roofing installation services. Just get in touch with us and enjoy the best roof installation of your life.