
The Ultimate Plumbing Inspection Checklist for Homeowners

Holding your plumbing system in well-being is crucial to avoid costly repairs and to keep your family comfortable and secure. It secures a clean water supply, removes waste effectively, and supports appliances like dishwashers and washing machines. However, ignoring plumbing inspections can create leaks, clogs, and other costly problems. Regular inspections help identify leaks, corrosion, or clogs initially on, and impede major and costly repairs. They also help maintain water and keep your home environment harmless. Whether you’re a new homeowner or have survived in your house for years, understanding the basics of your plumbing system offers you peace of mind and saves you money in the long run. Tools You’ll Need When starting a plumbing inspection, it’s essential to have a few basic equipment ready to make the work better and smoother. You don’t want to be a professional plumber; most of what you’ll be controlling can be done with simple, reasonable tools you may already have at home. Basic Tools for DIY Plumbing Inspections Flashlight Check into dark sections like under sinks, basements, or uphold appliances. Adjustable Wrench The adjustable wrench is used for tightening loose gear or shut-off faucets. Bucket and Towels It is utilized to grab any water and wipe spills. Plumber’s Tape (Teflon Tape) Utilized to seal threaded connections and help hinder leaks. Measuring Tape For inspection gaps or measuring pipe lengths. Plunger An essential tool to test and clear slight drain clogs. Drain Snake or Auger For intense drain cleaning or repair of slow drains. Safety Equipment Checklist Gloves To hold your hands clean and defended, especially when working with drains. Protective Eyewear Essential when operating under pressure or inspecting old pipes. Knee Pads (Optional) Beneficial when working on floors or in tight areas. Mask Advisable if there’s mold or sturdy odors, like in basements or crawl spaces. Kitchen Plumbing Checklist Plumbing in the kitchen is essential because water is used every day for cooking, cleaning, and other work. To preserve a competent kitchen plumbing system, there are various vital checks you must perform. Sink and Faucet Inspection: It’s crucial to verify your kitchen sink. If the tap is sopping or the water pressure is low, the washers or seals may demand replacing. Make sure the tap is correctly fixed and there are no problems. Dishwasher Hose and Drain: Inspect the dishwasher hose for any problems like leaks or cracks. If you locate any, exchange the hose. Test the drainage system to check water is draining adequately. If the drain is clogged, you’ll want to have it unclogged by a plumber. Garbage Disposal: It’s also crucial to explore garbage disposal. If unusual noises or the drain line isn’t clearing correctly, it may require maintenance. Clean it repeatedly to keep it functioning efficiently. Water Pressure and Leaks: The water pressure in the kitchen must be stable. If it’s low, there may be an underlying plumbing problem. Impede the pipes for leaks, especially under the sink and faucet joints. Under Sink Pipes: Inspect the pipes under the sink to ensure there are no leaks, rust, or signs of wear and tear. If the pipes are old, you may want to consider replacing them. Drain Performance: Check the sink and dishwasher drains to ensure they’re draining properly. If the drains are slack or there’s water backup, they will essentially be cleared. Bathroom Plumbing Checklist Your bathroom plumbing requires regular inspection to prevent leaks, water wastage, and offensive odors. Here are some key things to check: Toilet Function and Leak Check Check the toilet flush to ensure that water is flushing correctly and there are never leaks in the bowl. If the toilet maintains flushing constantly or the water level is high, the fill valve or flapper may want to be replaced. Showerhead & Faucet Inspection Check out the shower and bathroom valves. If the water pressure is low or the showerhead is flowing irregularly, you may take to clean or exchange the aerators. For some leaks, change the seals and washers. Bathtub and Shower Drainage Test the bathtub or shower to verify the water drains correctly. If the water is draining gradually, the drain will require to be cleared. Also, check out the drain pipes in your house. Water Heater Impede if the bathroom water heater is operating properly. If you observe a decrease in hot water flow or discover unusual sounds from the heater, it may want servicing. Also, verify the temperature settings to ensure they are acceptable. When to Call a Professional Plumber Some plumbing problems can be solved with basic tools and a little work. However, there are conditions where it’s better to hire a professional plumber otherwise, a minor mistake could create a major issue. Here are a few common conditions when you have instantly call a professional plumber: DIY Fix Isn’t Working: If you’ve tried to repair the problem yourself, and it preserves coming back (like frequent clogs or leaks), it’s an obvious sign that the issue is deeper than just a problem. Emergency Leak or Flooding: If water is coming out swiftly from somewhere in your home or there’s flooding, don’t waste time. This can result in major water impairment. Main Sewer Line Blockage: If various drains are blocking or you hear babbling sounds, this could signify a main drain line blockage something just a plumber can correctly repair. Strong Smell in the Bathroom or Kitchen: Continual bad scents coming from drains aren’t just a cleaning problem. They could sign venting or drain line blocks that require an expert’s inspection. Unexpectedly High Water Bills: If your water bill spits unexpectedly and there’s no obvious leak, you could have an undercover leak that only a plumber can find. Installing New Appliances: When you’re installing a water heater, dishwasher, washing machine, or RO system, it’s more secure and durable to have a proficient handle on the installation. Water Heater Malfunction: If you face different issues like not hot water, unusual noises, or a leaking
Top 10 Tips for a Successful Basement Renovation Project

Basement is a wonderful area to help increase the square footage and the utility of a home by following its renovation. Nevertheless, basement renovations can also be complex constructing works that need significant planning and profiling. We will discuss the best ten tips on how to make sure your basement finishing project is a success. First, let’s understand what constitutes a finished or a renovated basement. The characteristics of a finished basement are qualities that facilitate or enhance the use of the basement by the homeowners. This usually includes qualities such as: – Installation of the facility is done with drywalls painted – New sources of light incorporated include ceiling lamps, decorative lamps and any general or source of natural light. – Flooring such as carpet, tile or any luxury vinyl plank – Finish all two or multiple bathroom(s) along with kitchen additions – Additional modifications which fall under the category of heating and cooling are those related to an HVAC system. – All kind of custom storage and organization requirements Tips for a seamless basement renovation Assess How You wish to Leverage the Space When approaching any living space remodel, particularly a basement, you need to first decide how the space will be utilized. This involves the capacity of what rooms you wish down there; media, home office, children’s play area, junior suite? The advantages of defining the purpose as well as the floor plan at this point will be apparent as the remodel goes on. Check For Moisture, Mold and Air Flow Challenges Relative humidity is always a significant concern whenever there is construction of below-grade spaces such as a basement. Leakage or humidity indoors can cause smells and create conditions for mold. One should check for water seepage, proper water drainage around the house and proper air circulation. Check for moisture or growth of mold or inadequate ventilation before finalizing the walls or ceilings. Renovate the existing Electrical, Plumbing and HVAC systems New living space means new usage and therefore greater demand for utilities. Determine whether your current electrical, plumbing and HVAC systems need modifications to efficiently provide service to your finished basement. Should be noted that it makes more sense to make the changes on those lines in the renovation phase rather than after. Comply With All the safety and Building Codes Do not take shortcuts and ensure that any and all regulatory needs are met to the letter when doing a basement. This involves the provision of right features such proper fire alarms, smoke detectors, CO monitors, and fire extinguishers. Follow or surpass all building standards as you remodel to be safe from future problems that may arise. Select a Qualified Contractor with Basement Renovation Desire It is essential to hire careful and knowledgeable contractors for the finishing of the basement. Search for contractors that have a plethora of positive experience with the kind of basement transformations you desire in your area. Be very rigorous when checking the references and also make sure the contractor is legitimate with all the necessary license, bond and Insurance cover. Lay Out Your Home in Such a Way That Emerging Work Will Not Be Difficult for Plumbing Fixtures Good planning of the floor layout should be done to meet every need that a basement should provide. Consult with the designers concerning your distinct plan of where you want the walls, doors and stairs to be properly placed in achieving your working, moving around and storage purposes. Check if the needed space to accommodate necessary plumbing installations such as toilets, showers, sinks, washing machines, wet bars, and others is provided. Use appropriate Waterproofing systems Sealing technique of a basement mostly requires specific materials as others can pose serious threats for moisture related issues and to bear humidity. Today, possible remedies are basement waterproof paints and paint and, inside and outside foundation drains, as well as full basement tanking for undesirable leaks. Add Necessary Light And Air When most basements are initially built, they are usually small and are not well lit nor are they well ventilated. Turning that dark cramped feeling into a cozy one simply requires light and good air circulation. Provide natural lighting and have numerous LED options to light up the space. Make effective use of exterior venting, return air and fans to help with the control of stale and stale air. A Considered Approach to Framing, Finishing, and Painting Drywall Being able to see clean paint work and having a lotion of the color helps basements seem open. While it is most often used for interior partitions, we suggest the use of drywall with moisture and mold-resistant back in rooms listed above and all exposures of the building. Mainly use water borne classy and resilient to humidity paint products. Paint or use bold colors and themes that will bring the character and personality of their choosing. Choose Items to Style Your Basement Lastly, complete your basement space finishing process by adding a touch that will correspond to your intended use of the new space. For children’s play area, construct ledges and lockers for storage of toys. Upgrade guest suites with a mini kitchenette and beautiful modern bathroom accessories. Add ceiling molding, baseboard, closet organizers, refrigerator, entertainment center, fireplace, home bar etc. FAQs What should someone expect to pay for basic basement remodeling? The cost breakdown varies based on factors like: required to practice moisture control measures, modifications of layout, installation of better systems, materials employed, and special finishes among others. What is the typical time it takes to complete a basement renovation? The typical basement transform process lasts 4-8 weeks from the removal of debris to finishing work. A variety of innovative structural alterations, sudden repairs, or special add-ons take additional time in the renovation process. Which floor type is more suitable for the basement? The idea therefore is choosing a basement flooring that is resistant to moisture and humidity prone areas. Carpet on the basements is another factor that poses great danger due to
A Step-by-Step Guide to Roofing Installation

Of all the parts that make up a home, the roof is by far the most important. This tireless protector fights against everything nature throws at it, giving you the feeling of shelter and security. Whether you’re a seasoned do-it-yourselfer or a beginner about to take on their first major project, putting up a new roof can be overwhelming. Well, there’s no need to worry, because in this guide we will take you step by step through each process involved in the roofing installation. From material selection to laying that last shingle, we’ve got you covered. So roll up your sleeves and get ready to have a roof that will not only be strong, but stylish as well. Step 1: Understanding Different Roofing Materials One roofing system does not fit all. The market is littered with choices, each having its pros and cons. Here’s the rundown: Asphalt Shingles: The staple for most homeowners, and why not? They are inexpensive, durable, and have dozens of color options and styles. Most climates are easily accommodated by asphalt shingles, so they will do a great job keeping your house snug and leak-free. Metal Roofing: With a reputation for being very tough, long-lasting, and very energy-efficient, these rugged contenders can withstand just about everything that Mother Nature delivers. It has a high initial cost, but over the long term, it is cost-effective. Tiles: Ceramic or concrete, tiles give your roof an aesthetic touch of class. Ideal for homes in hotter climates, they are good for reflecting heat. But it is a structure that goes under them because, let’s be honest, they’re no lightweights! Step 2: Tools and Equipment Needed Before you climb that ladder, make sure you’re armed with the right gear. Here’s your toolkit checklist: Hammer and Nails: The bread and butter of roofing. You’ll be doing a lot of hammering, so get comfortable! Measuring Tape: Measure twice, cut once—a golden rule in the world of construction. Safety Harness: Safety first! A harness is a must to keep you secure up there. Don’t forget the safety equipment: Gloves: To protect your hands from sharp edges. Helmet: Keep that noggin safe. Safety Glasses: You only get one set of eyes—shield them from debris. Step 3: Removing Old Roofing Out with the old! Tearing off old shingles can raise quite a bit of dust and maybe a few memories, but it is vital to the process. Before you begin, practice safety first! Wear personal protective equipment, stabilize your ladder, and exercise extreme caution before attempting to remove the old shingles. Tear off the old shingles starting from the top down. You may use a roofing shovel or pry bar to lift shingles and nails. Important note: Dispose of old materials properly. In many locations, there are regulations on how to dispose of debris from construction. Proper material disposal minimizes environmental impacts and maintains your project in compliance with safety regulations. Step 4: Inspecting and Repairing the Roof Deck The removal of the old shingles unveils the deck of the roof. Now, here is where you will need to look for any type of damage—anything like rotted wood or water stains. Repair damaged areas with new wood. With a strong and clean deck, you can be assured that your new roof will be in place correctly. Cleanliness means a lot when it comes to roofing. Ensure that the surface is free from dirt, nails, and dust. A clean deck provides a much better base for the underlayment and shingles to be installed afterward. It is a bit similar to the strong foundation needed for a tall building. Step 5: Installing Underlayment Think of the underlayment as your roof’s first line of defense against water. Therefore, underlayment is an important material for weatherproofing to avoid leakages. The correct type of underlayment must be chosen according to climate and roofing material. Roll out the underlayment on the roof from the eave, overlapping with each course you go up. Attach it using roofing nails and then make sure it lies down smooth without any wrinkles in it. The underlayment will play a role in increasing the energy efficiency of your roof. It is another layer that offers resistance against moisture and wind, keeping the indoor temperature consistent, hence reducing energy costs and making the place cozier. Step 6: Laying Out the First Set of Shingles Now the fun part: laying shingles! Begin on the bottom edge of the roof, typically an eave, and work up. The very bottom row of shingles will dictate the lines on all of the rows that follow. Make sure they’re straight and square. Use a chalk line to help hold your rows straight. Fasten each shingle with roofing nails. The nails need to penetrate through the underlayment and into the roof deck. Proper placement ensures that the shingles are secure and resistant to wind and weather. Step 7: Completing the Shingle Installation As you move along a row, move to the next, ensuring that each shingle of the previous row overlaps the one beneath it. The overlapping forms a watertight roof. Pay attention to where the roof meets any vents and chimneys, as well as other roofline features. Here is where you want the flashing and sealing to be sufficient to stop any infiltration and keep the roof doing its job of protection. Laying down the shingles on the rooftop is a precise process. Each row should align perfectly with the previous one, maintaining a consistent pattern. This not only looks better but also enhances the roof’s ability to shed water efficiently. Step 8: Installing Roof Features Flashing is one of the most important steps in roofing. Flashing is sealing around chimneys, vents, and other penetrations to prevent water from sneaking in. Use metal flashing for durability, and just to be sure the sealing is right, you can secure the flashing with roofing cement. Next, all joints and edges must be properly sealed. Apply quality sealant so that there are no places
Top 5 Advanced Roofing Installation Techniques For Professionals

Constructing your dream building and can’t decide on your roofing installation? No need to worry! Gone are the days when we stuck to traditional, bland roofing methods. We’ve entered an era of innovative solutions, and the quality of roofing techniques has significantly advanced. As far as it goes, it is always a challenge for professional roofers to construct a durable roof with an appealing look. To help you with that, we’ve got you a list of the 5 advanced roofing techniques that you should consider. This way, you can prioritize what matters most—your family and home. Dive into our article and master the essentials of these latest techniques! Why are modern roofing techniques important? Your roof is the shield of your home. It defends from all sorts of weather mishaps. We must carefully choose the technique to install them, as the role they play is extremely crucial. Now, while the traditional approaches would appear more cost-friendly, they simply cannot compare to what is available in the roofing market today. Modern roofing is a one-time investment that offers ultimate protection, long-lasting existence, and enhanced energy efficiency. It is like giving your home a superpower shield! Get to Secure a Durable Future by These Top Techniques Master the fundamentals of each technique in detail and broaden your range of options for your next roof installation: Asphalt Shingle Roofing: Shingle Roofing is one of the most frequently used techniques out there that contractors prefer for their residential buildings. Different types of materials like wood, plastic, and slate but this modern technique favors the use of asphalt. Why most favored? Because they are not only strong but offer a guarantee of a lifetime, in particular architectural shingles. Asphalt shingles come in two main types: fiberglass and organic. Fiberglass shingles are lighter and have great fire resistance, making them a solid choice for safety. On the other hand, organic shingles provide excellent insulation. These asphalt shingles topped with ceramic, make the perfect match as the ceramic protects the building from UV rays. The larger shingles cover more surface area than smaller tile options, accelerating the installation process. Additionally, today’s architectural asphalt shingles feature a three-dimensional design that replicates the appearance of wood shake. How to install it? Starting the installation involves laying a “starter strip” at the roof edge, followed by carefully positioning shingles to ensure they are staggered, which prevents leaks. This method not only provides a secure fit but also enhances the roof’s overall look. With straightforward techniques and a variety of materials, shingle roofing remains a go-to choice for many homeowners. Built-in Roof Technique: An ideal technique for flat or low-pitched roofs is the Built-in Roof technique (BUR). Lasting upto more than 40 years, this technique strengthens and seals the roof. Installing correctly is crucial for ensuring the long lifespan of your roofs. It consists of three different components to form the roof of a structure: The first layer is adhesives to seal ply layers. It could be cold bitumen or asphalt The second Layer consists of fabric (ply sheets) and fiberglass ply. The third or topmost layer is the final touch to install the roof. It is made up of gravel and crushed asphalt. The BUR technique is more expensive than others on this list but is durable. It is well known for its installation properties. Further, it’s a good option for areas in warmer climates as it prevents UV rays from entering. However, it could be a hassle to remove snow from a built-in roof. Metal Roofing: Want a good return on your investment forever? Then, metal roof installation is the best option for you. Although this is not a new technique, metal shingles represent a more innovative application of metal roofs. This technique has a history of use on farmhouses, and commercial buildings but these days it is trending because of its durability of 100 years! The Process Installing a metal roof requires specialized tools and techniques, making it a job for professionals. DIYers might handle simple projects, but complex systems need experienced contractors. Homeowners should research materials and contractors thoroughly. There are two primary installation methods: through-fastener and clip-fastener systems. In through-fastener systems, the fasteners penetrate the metal panel to secure it to the roof deck. Clip-fastener systems use clips to attach the panels, with the fasteners driven through these clips, often concealing the fastener. What makes it special? Longevity: Can last 80 years or more with proper maintenance. Durability: Can resists harsh weather conditions and also is fire-resistant. Energy Efficiency: Reduces cooling expenditure costs in warmer regions. Aesthetics: You can opt to design metal shingles from galvanized steel, zinc, aluminum, or copper- it’s all up to you! However, if you are aiming to install a curved roof, metal roof installation is not for you. Also, additional coating is required as it is susceptible to rusting. Regardless, you will never have to replace your roofs again if you opt for metal roofing. Solar Roofing: Solar roofing is gaining significant attention globally as the best roofing solution in solar technology due to its ability to convert sunlight into electricity! Not only do you get to install a cool roof but also you can save your energy bills for a lifetime. These are simply shingled roofs that are covered by solar cells. Unlike traditional solar panels, these special tiles blend perfectly with the appearance of your house while also providing power. Each tile can produce 13-63 watts, making them a cost-effective and environmentally friendly option for homeowners interested in efficient and renewable power sources. You can even choose to be independent of the electrical grid or sell the extra energy produced back to the state. The only thing you need to make sure is that your building is situated to receive direct sunlight. Voila, you’ll become tech-savvy in no time! Green roofing: A recent advanced installation technique for environment enthusiasts is green roofing. It might sound a bit unusual, but more and more people are considering this option. If
The Benefits of Flat Roofing for Modern Homes and Businesses
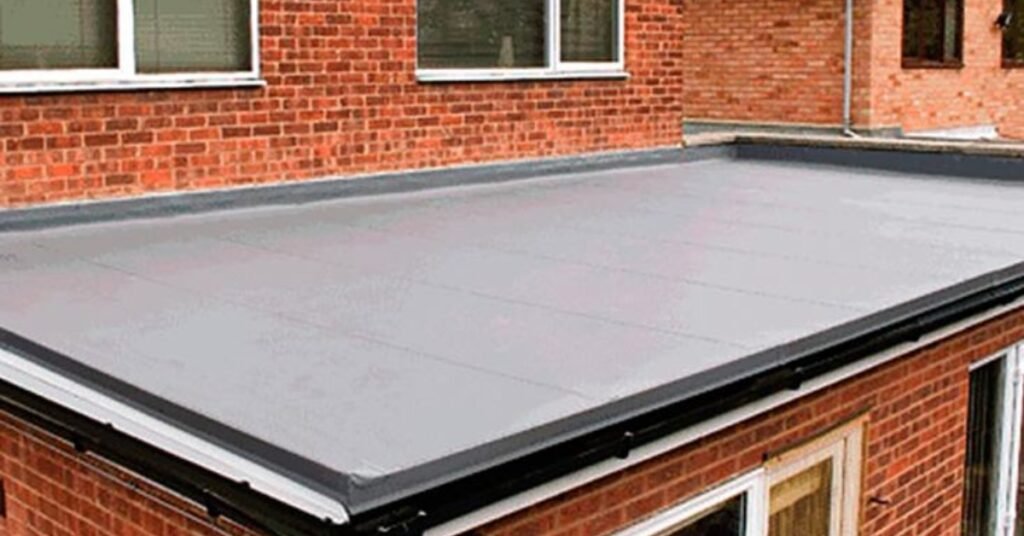
Such kinds of roofs as flat ones, which earlier were not favored, nowadays become preferred by people, choosing houses and offices. What could have caused this shift? Over time, with the advancement in the construction practices, many people have put more inclination towards the construction of flat roofs which are more competent in all aspects of construction. What Exactly is a Flat Roof? A low slope roof also referred to as a flat roof means any roof that has less than a 10-degree pitch. Slightly different from the contour that opens down to allow the water to roll off, the flat roofs also use the roof deck to create a technical surface for water shedding. Some of the types of flat roof systems that are familiar to homeowners and builders today are the built-up roofs, rubber roofs and plastic roofs. Starting from sustainability up to cost, durability, and aesthetic flexibility, flat roofs address problems that pitched roofs cannot. Major Benefit of Flat Roofing Systems Several benefits accrue to flat roof structures in comparison to sloping roofs. This makes flat roof systems ideal for use in most current construction projects. Some key benefits include: More space – Flat roofs allow for literal expansion of available space and do not require the depth necessary for sloping roof systems. They also provide areas for patio and rooftop terraces. All this added space is made possible without incurring any extra cost in construction of the structure. Ease of planning and design – this geometric shape of flat roofing makes the selection of load bearing structures and interior layouts more versatile. This enables architectural creativeness. Accessibility – Flat roofs are easier and safer with which one can walk and work than on sloped roofs. This makes inspection, maintenance and repairs easier to undertake. Sustainable – Today’s flat roof constructions provide the opportunity to achieve required insulation values and the integration of photovoltaic systems and green roofs. Long Term Efficiency – Despite higher first costs, properly constructed flat roofs can last 40 years or more. Overall costs in the long run are also reasonable and any dependent firm will consider this a great deal to tap on the capricious nature of the international market. Green Roofs Vegetated gardens roofs offer functions of the ecosystem which include, controlling of storm water and enhanced beautification. Sedums are usually planted and can be drought tolerant and despite their size, they do not need deep planting media. Solar Roofs Organic flat roofs can be utilized for producing clean solar electricity through the photovoltaic (PV) mounted on it. Solar roof installation is also easier on the flat roof than on the sloped ones, making them perfect candidates for the solar PV system. Cool Roofs Cool colored or specially reflective roof membranes help to reduce the radiation of heat into the building and thus there is less need for an air conditioner. This enhances the comfort of the occupants, cost and energy effectiveness of the building. Modern Flat Roof Systems constructed: Although the assembly can have almost no pitch, which is not very common, most have minimal pitches for drainage purposes. Today’s advanced waterproofing membranes and other materials that are used in today’s flat roofs are much better in terms of performance and durability as the earlier designs of flat roofs. Common assembly methods include: Built-Up Roofing (BUR) BUR systems consist of one or more layers of waterproof membranes bonded by hot asphalt or adhesive in one unbroken layer. These assemblies can therefore last for 30-40 years if maintained well as has already been discussed above. Polyvinyl Chloride (PVC) PVC roofs are made of a single PVC membrane that has to be heat welded. This is a big bonus for PVC since it makes it suitable for application with more range of roof decks than some other materials. Most types have 20+ year life spans. Thermoplastic Polyolefin which is abbreviated as TPO Also TPO systems use a pliable, welded single ply roof membrane composed of thermoplastic Olefin. Resistance to chemical / acids is better and membrane colors such as white reflect heat better making it more durable and energy wise. The choice of flat roof solution depends on certain needs of the building in question that we are to construct. When selecting a system, consider: Structure – An engineer should determine if the current structure will be able to bear the load of a flat roof system and the load from snow or water. Climate – Local weather conditions and level of UV radiation influences the type of membranes and coatings used. Purpose – Do you plan to make your flat roof act as a patio, or use it for planting greenery or solar panel support? These uses are accordingly met by specific construction approaches. Budget – The prices for initial installation may differ greatly depending on the assemblies, as does the longevity of value. Aesthetics – If the flat roof is going to be apparent, the color and the membrane patterns offer exposure to personal choice based on the owner’s vision. Although a flat roof may be a good idea for one’s home, some conditions such as areas with very low temperatures that come with heavy snow and or ice should consider one with a steep roof. Due to lack of slope, flow, or gradient, flat roofs rely on melt drain structure to avoid common problems like ponding water. Residential and commercial structures in areas that experience freezing temperatures throughout the year adopt the installation of metal sloped roofs. A flat roof also reduces the incorporation of forms such as gables and dormers that are mounted on rooftops. Essentially the flat roof type and its surface can by definition fail to provide more geometric designs for its architectural plans. While flat roofs offer some limitations to exterior design opportunities they provide other opportunities. Moreover, the flat roofing design performs its function differently and it requires the contractor to use specific construction methods and types of roofing installation materials. Selecting
How to Maximize Space and Functionality in Your Bathroom Remodel
Bath remodeling is a great way of increasing the value and efficiency of your house and this will take a relatively short time. But in fact, generally, bathrooms can hardly be described as spacious and large. Because of this, adequate planning and designing of the building is required to ensure that it fits in a small space available. This is done in order to capture as much space as possible because space is a critical aspect in construction and design. How to Redesign the Tiny Bathroom and Make it Look Bigger Small bathrooms are particularly uncomfortable as they feel claustrophobic and most are usually poorly lit. There are several design techniques that can make the space look and feel larger. This includes an added sense of space that gives even a small bathroom the ambiance of a spa. First of all, choose calmer shades for walls, floors and cabinetry. Dark colors make the space look smaller and the right colors make the room look bigger. Light could also enter the space through glass shower doors. Second, limit bold patterns. Large tiles or dark joints divide the area by creating limitations on floor space. Instead, the use of large tiles and thin grout joints help to maintain the continuity of the lines. On walls, flat colors or low-relief patterns make the space appear larger. One can also expand the view of the room by reducing the number of items that are placed in the room. Do not include many fixtures and accessories; they should be limited so that each one has a function. Last but not the least, learn how to make the ceiling appear higher with the help of vertical accents. Verticals – subway tiles, elongated lights, or thin vertical stripes make people look upwards. This makes the bathroom look more spacious than it actually is. What Other Storage Options Can Be Incorporated During A Remodel? For most homeowners, storage is the primary consideration when it comes to a bathroom remodel. Fortunately, there is always a way to find the storage that you need and will also actually fit into your home. For counter space storage, build new drawers into the new vanity or new cabinet. This holds items that otherwise would have been placed on the counter top space. For the more specific organization of the items, one can use trays or bins when storing the toiletries in the drawers. Wall cabinets, for instance, offer shelving as well as make use of the upright space. Square shelving is used and it fits very well around the mirror and the medicine cabinet. These are used to display decorative items and at the same time arrange the essentials in an orderly manner. Open shelves have more exposure than enclosed cabinets that use doors to cover all the contents. Under-sink storage for other cleaning supplies and spare toilet paper ensures they are hidden but easily accessible. With pull-out trays, tilted open cabinets, or the slide-out hampers. For families, add cubbies or lockers. These afford each family member his or her own area for shower accessories, towels, and other personal hygienic requisites. This one ensures that everyone owns the labels they post. Adjustable organization is another feature that allows for the most space to be dedicated to seasonal items. An experienced remodeler can assist in choosing options that will make items most frequently used easily accessible while concealing clutter. What Adjustments Should I Make If I Plan To Age In Place? Unfortunately, one can develop health or mobility issues that make even simple things like using the bathroom a nightmare as they grow older. A homeowner can design and build a safe and accessible bathroom that is appropriate for all users, including children and the elderly. The initial recommendation is grab bars for stability and balance purposes. Position bars close to toilets, showers, bathtubs, and walls. Identify the areas where horizontal and vertical bars are placed and ensure that these are strong and stable. There should be sufficient space to comfortably grab bars. Remove the shower or bathtub and install a low, barrier-free entry shower instead. Curbless showers do not contain a lip that needs to be stepped over which makes the access easy. Provide a fold down seat and a hand shower that can be adjusted. These help users with mobility impairments These help users with mobility impairments. A comfort height or ADA compliant toilet is one that is higher than a conventional model. The rise in height relieves the pressure when sitting or standing up. There are additional elongated bowls and bidets for better convenience. Overall task lighting allows aging eyes to see what they are doing or what is happening around them. Place fixtures that will sufficiently light up every region without any darkness. These are used to control the amount of light in the room as there are varying levels of intensity. This is true because flooring should encourage people to walk with more confidence. Do not use high gloss floor surfaces, small tile patterns seem to be uneven from foot. They also provide additional friction wherever it is required. A bathroom remodeling contractor can assist in choosing and getting additional items for safety and to meet the independence goals. These include grab bars, non-slip textures on the floor and walls, comfort height fixtures, and accessible storage designs. These thoughtful elements enable its usage throughout the different phases in life. Conclusion The best design allows any bathroom to appear as spacious, aesthetically clean, and fully utilitarian as possible. Storing necessities out of sight preserves the visual appeal of the space, which is important when designing rooms. In the same respect, the individualized and mobility-friendly storage solutions enhance the independence for all clients. You can give some creative ideas to the spatial arrangement and use bespoke storage solutions. By doing this your new bathroom can be aesthetically pleasing, functional, and comfortable for as long as you want. FAQs How can I expand a small bathroom? Utilize mirrors, light color,
Top 5 Basement Color Schemes for a Modern Look

Have you ever considered changing the style of the basement to be more contemporary? Choosing the correct colors is one of the best ways to give your basement a more modern look and feel. The colors that you select give shape to the whole look and feel of the room and how it will be used. Ranging from dark and daring to fresh and minimalistic, almost anything is possible in this case. To help you with your basement remodeling project, we will discuss top 5 suggestions of colors that can give your home a modern and fashionable look. When used with the appropriate materials, textures and finishing’s these color ideas will blow your guests away while making for an enjoyable family space. What Are Some of the Best Color Combinations for Modern Basement Designs? When painting your basement to provide it with a modern look, you should look for colors that are pristine, bright and glossy. Some of the current trends in the color choices for basements are white, gray, black with some splashes of color. Another common theme is the monochromatic color schemes that use different shades of a single hue. Do not hesitate to apply intense, pure tints for high contrast and expressive accents. ‘Gleaner’s’ such as gold, silver, bronze bring glamor and luxury to the products. If you are thinking of the color scheme, then it should be as simple as possible and without much detail. Even more, let the style, the drawing, the tints and the various materials explain themselves by keeping the chromatic range as close to zero as possible. Do not use complex patterns and contrasting shades on the same piece of furniture. Below are our favorite color combo ideas for the paint, furniture, accents, and much more to use. What should I Know About Creative Interior Painting for Basement Remodeling of My Home? Adopting lighter neutral tones such as white, beige and gray when remodeling your basement has numerous advantages. It can assist in making a basement that is small, poorly lit and cramped to appear more light and larger. This makes light colors to reflect more light thus enhancing the brightness. Neutral backdrops also help in providing a good base for the addition of colors in accessories, furniture and artwork. Pale shades are described as classic, minimalistic, and fresh. White painted brick, a light gray entertainment center, beige living set and pale hardwood floors are used to maintain simplicity. Accent metallic, black and wood for texture. White and Wood – A Gentleman’s Brick Lounge The chosen, rather versatile option is associated with white as the primary color with natural wood as the secondary color. The white painted walls, trims, ceiling and brickwork, coupled with the warm wooden furniture, floor and built-in are tailored and masculine that creates the right feel for a gentleman’s lounge. Include charcoal gray in the sectional, bar equipment, and modern lights to achieve the luxurious look. Use this light and neutral combination where you want the rooms to be visually larger and the architecture of the space to be more apparent. White complements the custom shelves, wet bar, wine fridge, and brickwork. Small green accents in the form of real plants and art make the space lively rather than clinical. This is because having a clean white background makes it easy to add colors and patterns as time goes without creating a clash. Consider this concept in a basement home cinema, games room or living area. Black, White and Wood – Sleek Industrial Media Room To achieve today’s edge, a monochrome palette accompanied by wooden elements looks like a perfect embodiment of the industrial-chic aesthetic. Such combination of these two shades of color creates a strong graphic feel as well as enhances the features of the lines. Paint the walls and ceiling with a high-gloss black or dark gray; paint all the trim, pipes, vents, recessed shelves and built-ins white for punch. Include the natural wooden floorings, furniture, shelves and stairs to warm and to have an anchor. Choose a gray fabric sectional sofa and bright geometric rug as the dominant furniture, painting the wall behind the media in white. Include black and white prints, vivacious cushions, glass vases and sculptural lighting for aesthetic purposes. The result is an urban-chic mix perfect for a basement media room, lounge or entertaining area. All White with Pops of Color – Modern Living Room It is possible to use only white to paint the walls and then add color and texture through objects, furniture, paintings and other accessories. Interior paints the walls, trim, ceiling, doors, vents and pipes white it is refreshing and clean. Introduce engineered white oak hardwood in lighter shades and area rugs to bring warmth into the interiors. Select white sectional or mid-century sofa, chairs, coffee and console tables. Base it on a brightly colored abstract area rug that sets the tone for the accent color scheme of the rest of the room. Introduce various colors such as emerald green, sapphire blue, and citron yellow in cushions, rugs, sculptures and paintings. Introduce hot pink or orange mid-century modern chairs. Add acrylic, glass and Lucite tables and décor for touch. White on white solidified with bursts of bright youthful colors which is suitable for open concepts living spaces. This color scheme is appropriate for any room in the basement. Gray and Yellow – A Pleasure to See this Recreation Room! Designing a recreation room or lounge with gray and yellow as the colors of choice. Gray is a warm neutral that can be used to enhance other colors as a reserved and elegant base, perfect for more vibrant tones. For the walls, choose a light dove gray shade, and for the trim and the ceiling, opt for a shade slightly darker than the walls. Introduce some golden yellow in couches, stools, pendants, and decorative items. Lastly, incorporate a bright-colored geometric area rug to give the color scheme a focal point. Introduce black and white contrast to create differentiation,
Maximizing Space: Creative Basement Layout Ideas for Modern Homes
Do you want to know how you can efficiently make use of space in your home that is not in areas like the attic or the basement? Most homeowners overlook the basement area, but with proper planning, it is possible to turn it into livable space that can be used by the entire family. If you need basement remodel ideas, it is important to know that with some careful thinking and proper organization of space, you can always achieve a beautiful and stylish basement that is as close to the style of the above floors as possible. In this blog post we’ll share some ideas for basement remodeling that is new and exciting and might help you in your next remodeling project whether it will be a DIY project or you are going to hire a contractor from American Home Remodeling. Discover below the ideas of storage space, spatial organization, lighting and color, and finishes that would turn those cold and dreary basement squares into a comfortable contemporary basement. Creative Storage Ideas Among the most crucial factors that should be put into consideration when planning to finish a basement is the planning for adequate and intelligent storage space. This way you can fold it and store it when it is not in use to ensure the space does not look cluttered or messy, because even seasonal clothes, toys, kids’ items, sports equipment, and other pieces of furniture can be stored here. Some creative built-in storage ideas for basements include:Some creative built-in storage ideas for basements include: Spaces behind bookshelves and underneath any staircase landing Solid walls of tall cabinets with doors all the way to the ceiling. Shelves and Built-in cabinets, and entertainment units Basement bedrooms equipped with pull out drawers underneath the bed These are lockers that have specific niches, shelves and hanging rods which are designed in a way that allows them to be easily accessed. Space-Expanding Layout Concepts It is very important to think through how basement space should be, or could be divided and separated into various functional areas in order to achieve the ‘open’ effect. Some layout ideas that can make basement spaces appear larger include: Open Floor Plan: Open design and knocking out or installing low height partition walls gives the basement environment an open view to the surroundings and hence an illusion of more space. Sunken Living Room: Lowering the floor of a room or making it sunken by at least several feet and then making the living room look like a sunken room gives the room a taller ceiling and more mass. Natural Light Sources: The inclusion of supplementary windows, glass block walls, and light tubes brings natural light into darker basement areas, essentially increasing the former’s illumination Monochromatic Color Scheme: The absence of any intricate design elements and incorporation of neutral colors even in basement areas helps in creating a uniform and less congested look. Multipurpose Rooms: Fitting basement arrangements such as bedrooms, lounges, or entertainment rooms in a way that they can be easily converted from one form to another is efficient as it conserves space and, therefore, money. Eye-Catching Lighting Concepts Another important aspect of designing basement lighting is that since most basements do not receive much natural light, some extra effort has to go into the smart placement of lighting fixtures. It is necessary to make an adequate usage of ambient, task and accent lighting. Creative basement lighting ideas include: Light fixtures on either side of a wooden floor with carpeted steps. LED rope or track lights installed in coffered ceiling formations This includes bringing in natural light by means of skylights, light tubes and light wells. The flush mount fixtures ought to be over game tables. Swing arm lamps and floor lamps that enable the flexibility of the kind of lighting to be used for a particular task. Loud chandelier type of lamps placed over a living room or a cocktail area Always seek advice from a lighting designer or an electrical contractor, to ensure that the lighting scheme that is being installed meets the requirements of visibility, safety, and aesthetics. Selecting the Durable and Attractive Colors It goes without saying that color choices mean a great deal when giving basement spaces the finishing they deserve. Blend low-temperature, calm shades that look good in subterranean structures. Ideas that work for contemporary basement color schemes include: Soft gray, greige and taupe does well as walls as they form a neutral yet soothing background. Its clean white on trim, doors and built-ins to help freshen up the spaces Contrasting colors like navy or slate blue bring visual appeal when painted on an accent wall. Crown moldings, built-ins, and hardwood floors with rich wood stains give warmth. Sleek black or white kitchen and bath tile for a shiny and glossy appearance Metallic pewter or even silver or gold highlights give the flavor of looking glamorous. Selecting the Right Finishes To make furnished basements more durable, when making the decision about the chosen finish you must be able to stand up to water and abrasion. Reliable floor covering and other coatings, which will not be damaged by water, paints and other protective materials shall be durable and should be used to avoid scratching by children or teenagers who will be using the area. Some great options include: Flooring: Polished concrete slab, sealed & stained concrete, luxury vinyl plank, porcelain or ceramic tile, and engineered hardwood like oak or hickory. Wall Finishes: Moisture-proof interior paints and varnishes, mold/mildew-resistant coatings, FRP panels around wet zones, and green-screeds for bathroom/ laundry areas. Ceilings: Replace any moisture-prone ceiling with tiles, panels or boards that are made from vinyl or mold-fighting paper-faced products to avoid the ceiling from sagging. Creative Basement Remodeling Ideas Knowing the peculiarities of layout, storage, lighting, colors, and finishes suitable for the basement area, it’s high time to turn to the most interesting part – to find and envision some cool ideas for the basement design! Contemporary basement additions that are
20 Budget-Friendly Home Improvements for Every Homeowner

Every homeowner wants to make their home better and more comfortable, but not every one has a large budget. Today, we will share some budget friendly home improvement ideas that you can easily apply in your home, which can improve both the look and functionality of your space. These changes will help transform your home’s overall setting, giving it a fresh look without spending too much money. Fresh Coat of Paint: The color of the walls in every home gradually vanishes overtime. A fresh coat of paint is an affordable and easy way to give your walls a new look. You can paint the walls yourself if you have basic DIY skills or hire a small painting service to get the job done quickly and successfully. Refreshing the color of smaller rooms or showcase walls can also make your home look modern and fresh. If time is an issue, it’s a good idea to use fast drying paints. Install New Light Features: Replacing old and dull light fixtures with new, stylish lighting can transform the look of your home. Replacing simple ceiling lights, hanging lights or wall lamps adds brightness and elegance to your home. This is a budget friendly way to renovate your home’s style. You can find many affordable and attractive lightning options in the market that reflect your style. Update Cabinet Hardware: Kitchen or bathroom cabinets hardware gets old fashioned and replacing it is an affordable and effective solution. Replacing handles or grips can give your home furniture a fresh new style. You can choose antique style, modern simple or even antique hardware that matches the theme of your home. Install New Backsplash: Installing a new backsplash in the kitchen not only makes cleaning easier but also improves the appearance of your kitchen, giving it a modern and Stylish look. Subway tiles, peel and stick tiles or design tiles can be used as budget friendly options. You can install it yourself if you’re into DIY, or you can hire a professional for the installation. Add Shelving: If your home lack storage, installing shelves is an easy way to organize space. Shelves help you create extra storage space and also allow you to arrange things easily in your kitchen or living room. You can create extra storage by installing shelves in your living room, kitchen or bathrooms. Open shelving can make your home look airy and large and you can showcase decorative items. Replace Old Faucets: Replacing old faucets can give your kitchen or bathroom a new look. By installing energy productive faucets, you can save water while renovating the look of your home. This small change also make your daily use items more functional and helps save money in the long term. DIY Wall Art: Making DIY Wall art is a creative and budget friendly way to personalize your living room or bedroom. You can use simple frames, canvases or even fabric pieces that reflect your style. This style not only beautifilies your home but also highlights your creativity. For inspiration, consider exploring many DIY Wall art projects that suit different styles and budgets. Re-grout Tiles for a Fresh Look: If the grout between your bathroom or kitchen tiles has become old and discolored, re-grouting is an affordable and straightforward solution. Refreshing the grout can make your tiles look neat and clean, enhancing the overall cleanliness and hygiene of your home. This process allows you to give your existing tiles a new look without the need for replacement. For a step by step guide on re-grouting tiles, you can refer to this complete guide. Add a New Mat: Introducing a stylish mat to your living room, dining room or bedroom can enhance both comfort and stylish. Mats not only protects your floor but also contribute noticeable to your home’s decor. You can find Budget friendly and attractive options that compliment your home’s theme. For example, the company stores offers a Turkish cotton bath mat that is both luxurious and affordable priced. Upgrade Your Front Door: Your front door helps as the first impression of your home. If its looking dated, consider refreshing it to boost exterior charm. Simple updates like a fresh coat of paint, new hardware or decorative elements can make a important difference without a notable investment. For example, a homeowner transformed their plain white PVC front door using pre coated stained glass film from B&Q. Also, updating exterior finishes, such as trim and shutters, can enhance your home,s outlook. Install a New Shower Head: To install a new shower head, start by turning off the water supply to avoid any leaks or water flow. Use a wrench to remove the old shower head by turning it reverse. Once removed, clean the shower bracket threads with a cloth to remove any old tapes. Next, wrap plumber’s tape around the threads of the shower arm to secure a tight seal. Screw the new shower head onto the arm, turning it clockwise until its securely in place. Finally, turn on the water to check for leaks, adjusting the shower head as needed. Plant Indoor Plants: Indoor Plants are a great way to bring nature into your home while improving the Indoor environment. They not only add beauty and color to any room but also help purify the air by absorbing toxins and releasing oxygen. Popular indoor plants like snake plants, Peace lilies and pothos are low maintenance and grow in many light conditions, making them perfect for both beginners and experienced gardeners. Caring for indoor plants can also reduce stress, enhance productivity and create a calming atmosphere. With the right care, indoor plants can grow, making your living space more bright and healthier. Conclusion: Budget friendly home improvements can make a important impact on the look and functionality of your home without breaking the bank. In case its through small upgrades like adding a fresh coat of paint or largers projects like gardening, there are many ways to enhance your living space on a budget. By
What Are Risers in Construction?
The world of construction is boundless, and every major element with in it holds considerably importance. Risers are also an important part of construction, used in many systems such as plumbing, electrical, and HVAC. Their role is to protect the skillful and safe partition of these systems within a building. Understanding risers is important for construction professionals and engineers to protect that their placement and functionality are well combined during the design and construction stages. In this article, we will discuss risers in detail, inquiring their types, functions, and the importance of understanding them. What are Risers? In simple terms, risers are standing pipes, ducts, or conduits that distribute many services between the floors of a building. These services may include: Water Pipes (plumbing) Electrical Cables (electrical systems) Air Ducts (HVAC systems) Gas Pipes (in case of gas systems) The main function of risers is to supply facilities from one floor to another. These many parts supply services to each floor, protecting the skillful distribution of resources such as energy and water everywhere the full building. Types of Risers: There are many types of risers based on each their handle. Every riser has particular needs that decide its working and setup method. PLUMBING RISERS: Plumbing risers are straight pipes that manage water supply and sewerage systems. They are responsible for movement of water to different floors of a building. WATER SUPPLY RISERS: These risers hold clean or treated water to the upper floors of the building. WASTE AND DRAINAGE WATER RISERS: These risers hold used water or waste from the building to the lower floors or the drain system. The elements used for plumbing risers can change. Usually, they are made from PVC (Polyvinyl Chloride), copper, or cast iron pipes. Electrical Risers: Electrical risers pipes are vertical tubing or cable trays that spread electrical wiring completely a building. Their main function is to move electrical current from the main service board to many floors, protecting a secure power supply for lighting, air conditioning, lifts and other electrical accessories. These risers can provide both high voltage or low voltage wires. The tubing are typically constructed from materials such as steel, PVC or aluminum to provide protection against physical damage and to meet safety standards. The setup of electrical risers needs careful planning to obey with safety standards and building codes. Proper design protect that the building’s current and future power demands are completed successfully, reducing the risk of electrical risks and maintaining a safe environment for roomers. HVAC Risers: HVAC (heating, ventilation and air conditioning) risers are pipes that distribute air to different floors of the building. These risers hold air to upper floors and help maintain the ventilation system within the building. HVAC risers are generally covered with sheet metal and flexible piping. Gas Risers: Gas risers are vertical pipes that distribute natural gas to the floors of a building. Their purpose is to deliver gas to the kitchen, heating systems and other gas appliances. Gas riders are typically made of steel or cooper and their design secures they can safely bear pressure. Fire Risers: Fire risers are responsible for distributing fire protection systems to different floors of a building. These risers supply water to sprinkler systems or fire hose reels. When designing fire risers, it is important to consider safety codes to protect that fire systems can operate successfully in an emergency. Design And Planning Of Risers: The design and setup of risers is a careful process that requires proper planning and management. Here are some important elements that are reflected in riser planning. Building Layout: The layout of the building effects the placement of risers. If the building has many floors, risers are typically fixed Ina central location to protect skillful distribution. Risers are installed within walls, rods and service main parts. Access And Maintenance: Risers should be installed in locations that provide easy assess. This access is important for future maintenance and repairs. If risers are placed in inaccessible locations, it can lead to problems in the future. Fire Safety: Fire Safety codes are taken into account when designing risers. Fire risers are normally combined with the building’s fire safety system. Material Selection: The selection of material for risers is also very important. Different materials have their own properties, making them suitable for specific applications. For example, Cooper is commonly used for plumbing risers, while PVC or steel is more suitable for electrical risers. Regulations and Codes: Every country or area has its own building codes and regulations that effect riser design. These codes protect that risers meet safety standards and do not affect the overall honesty of the building. Risers Installation Process The installation of risers, typically used for vertical transportation (like in elevators, electrical systems, or plumbing) or in other infrastructure applications, requires careful planning and execution. Below is a detailed explanation of the riser installation process. Pre-Installation Planning Before the real setup begins, it’s important to perform detailed planning. This includes fixing the riser location, confirming the design details and preparing the needed tools and materials. Design Review: Make sure the riser system design follows with all regulations and details. Site Check: check the setup site to detect ability challenges like blockages, space regulations, and current facilities. Material Check: Secure all riser parts, pipes, cables and connectors are available and meet quality standards. Safety Protections: Safety is important during the setup of risers. Take the following protection: Protective Tools: Installers should wear safety tools, including gloves, helmets and safety shoes. Clear Workshop: Secure the workshop is clean and free from rubble to avoid accidents. Risk Assessment: Management a safety risk review before starting the setup. Setup of Riser Supports Riser supports are important for protecting security and arrangement of risers. They must be set up according to the design details. Positioning Supports: Install the riser supports at the selected points to hold the riser pipe, cables or tools safely. Utilizing and Positioning: Secure the supports are properly balanced and set to stop any